
Most people have probably never changed their DNS settings. Hell, most people probably don’t even know what DNS is.
That’s fine. You don’t need to be a network engineer for this.
Most people use whatever DNS their internet provider gives them and never think about it. For this guide, you don’t need to understand the technical side. We’re just changing that setup so NextDNS can help filter ads, trackers, and other junk before it reaches you.
I use NextDNS, and I’m going to show you the basic setup I use. We’re not going down the rabbit hole with every setting it offers. We’re going to turn on a few useful protections, add the filters, install the Windows app, and make sure the damn thing is working.
1. Set Up NextDNS
Create a NextDNS account and open your Setup page. NextDNS gives your configuration its own ID. Keep that ID private. You’ll notice the private values in these screenshots are hidden for exactly that reason.
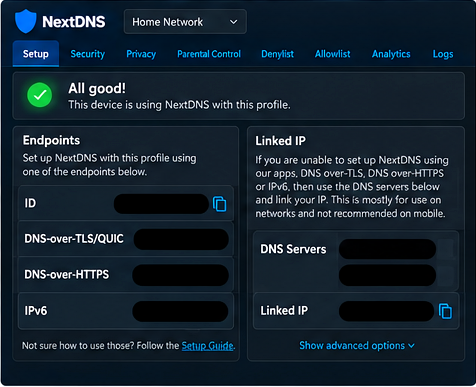
The blacked-out information in my screenshots is account-specific. Use the values NextDNS gives you in your own account — don’t copy mine or anybody else’s.
This page looks like there’s a lot going on, but don’t worry about most of it right now. We’re keeping this simple. Once your account is ready, click the Security tab.
2. Turn On the Basic Security Settings
This is where we turn on the basic protection. You don’t need to know what every switch is doing yet. For a basic setup, these are the settings I use:
- Threat Intelligence Feeds — ON
- AI-Driven Threat Detection — ON
- Google Safe Browsing — ON
- Newly Registered Domains — ON
- DNS Rebinding Protection — ON
- IDN Homograph Attacks — ON
- Typosquatting Protection — ON
- Domain Generation Algorithms — ON
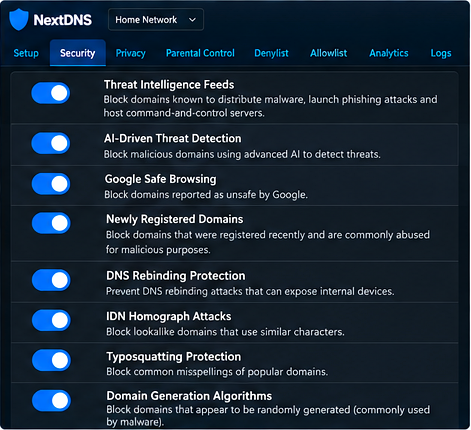
You don’t need to know exactly what every one of those does to get started. The simple version is that we’re giving NextDNS several ways to identify domains we probably don’t want the computer connecting to in the first place.
And no, this doesn’t mean you can uninstall your antivirus, turn off your firewall, and start clicking every sketchy link somebody emails you. This is another layer of protection, not a replacement for everything else.
3. Block Ads and Trackers
Next, click Privacy. This is one of the main reasons I use NextDNS: it can cut down a lot of advertising and tracking junk without making you configure every app one at a time.
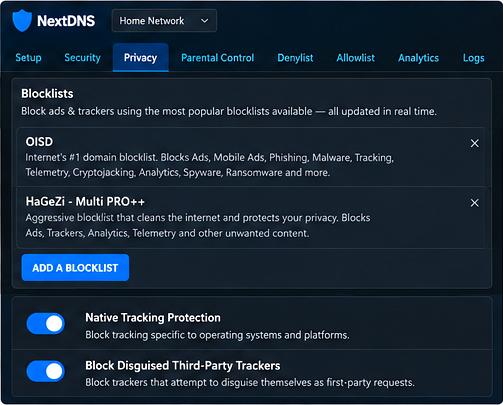
I keep this pretty simple too. I use OISD and HaGeZi Multi PRO++. I also turn on Native Tracking Protection for the operating systems I’m using and enable Block Disguised Third-Party Trackers.
You’ll see a pile of other blocklists available. Don’t go nuts. More blocking isn’t automatically better. Eventually you’re just stacking lists that block a lot of the same stuff and increasing the chances that something you actually want to use gets broken.
Start with a couple of good lists and leave it alone. If you have a reason to change it later, change it later.
4. Install NextDNS on Windows
Now we actually have to make Windows use the configuration we just created. Go back to Setup and select Windows.
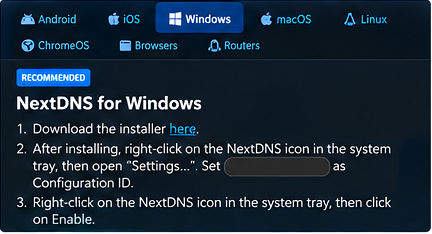
NextDNS gives you a couple of ways to do this. You can manually configure DNS-over-HTTPS in Windows 11, but that’s not what I’m doing for this basic guide. I use the NextDNS Windows app. It’s easier.
Download the installer from your own NextDNS Setup page, install it, and open NextDNS from the Windows system tray. Go into Settings, enter your own Configuration ID, enable NextDNS, and set it to start with Windows.
Use your ID, not one you found in a screenshot or copied from somebody else’s tutorial. Once that’s done, you’re basically finished.
5. Make Sure the Damn Thing Is Actually Working
Don’t install something and just assume it’s working. Go back to your NextDNS Setup page. You should see the message that the device is using NextDNS with your profile. Then open Logs.
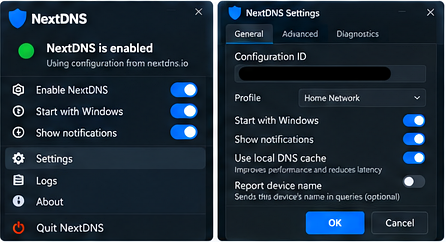
Use your computer normally for a minute. Open a few websites. Open an app. Watch a video. You’ll start seeing DNS requests show up in the log.
This is actually a pretty good way to see just how much stuff your computer talks to in the background. Some requests will be allowed normally. Others will be blocked because they matched one of the security or privacy filters we turned on.
6. How Much Stuff Does It Actually Block?
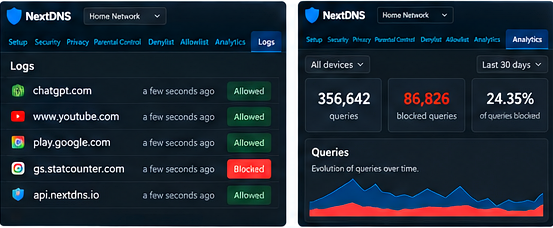
Over this 30-day period, this configuration handled 356,642 DNS queries. Of those, 86,826 were blocked. That’s 24.35% of all DNS requests.
Don’t look at that number and think I stopped 86,826 hackers from breaking into my computer. That’s not what it means.
That number can include ads, trackers, telemetry, analytics services, domains we’ve intentionally filtered, repeated background requests, and potentially malicious domains. The point is that a pretty significant amount of stuff my devices tried to contact was stuff I didn’t need or want them talking to.
7. What If Something Stops Working?
Eventually you might run into a website or application that doesn’t work correctly because something it needs got caught by one of your filters. Don’t start randomly turning everything off.
Go to Logs first. Try using whatever isn’t working and look at what’s being blocked at that moment. If you find a legitimate domain the application actually needs, NextDNS has an Allowlist where you can permit it.
That’s a much better solution than disabling half your protection because one website threw a fit.
That’s Really It
You can make NextDNS considerably more complicated than this. There are parental controls, custom allowlists and denylists, different logging options, manual DNS-over-HTTPS configuration, router-level installation, and plenty of other settings.
For now, keep it basic: turn on the useful security settings, add a couple of good privacy filters, install the Windows app, and make sure it’s actually working.
That’s the whole point: cut down some of the junk and get a little more privacy without needing to understand the networking behind it.